Wednesday, November 23, 2011

Buttons On Display Bracelet


Many of my friends, who don't know how to crochet, were asking who taught me how to crochet. I told them my Nanay (filipino word for Mom, pronounced as Na-Nay). It's in the blood, also, from both sides, maternal and paternal. My Lola(lo-la, grandma) Diyang, mom of my Tatay(ta-tay - father), used to crochet bonnets and booties to all her Apo ( a-po, grandchildren) as a welcome to the clan gift. My Tiya(ti-ya,aunt) Menang and Tiya Gloria patiently crocheted big curtains, bedspread, doilies and table runners for their homes. Someday I will feature their vintage works when I have the opportunity to visit Cebu. Their projects were all made of cotton threads.

When I was in grade 5, our Home Economics project was to crochet a doily. I was not interested then, cause the cotton thread using #7 steel hook was hard to draw up the loop, so I gave up, most of my classmates, too. I just let my Nanay crochet my project, a nd even my classmates, they just paid someone to crochet the doily. Silly us!!! Sorry, young ones just like to play, play and play. Ha, Ha, Ha!!!, the good old days.....But, I found out until now, this practiced still existed. Now, it's my turn. Some students are paying me to crochet their projects. Why? because for beginners cotton thread ticket #8 using #7 steel hook is so hard to crochet, especially young ones.

In 1999, I started using tiny cords(alternative to yarn) as my materials for crocheting most of my projects especially bags. Cords are durable, machine washable and very easy to crochet, bags can be done in a day.

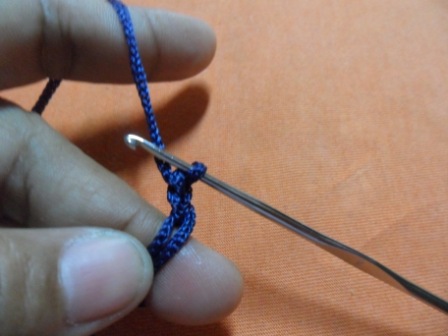
In my crochet mentoring for young and adult beginners, this is what I teach first:

Tuesday, November 15, 2011

EMBROIDERY

My crafty friend and neighbor, Alice, asked me if I'm interested to accept embroidery work. I said, "definitely, YES". Most of my friends really thought i only do or accept crochet works. So, this week , this embroidery work adds up to my work - in - progress.


It is the SAUCY SQUIRREL KIT
From Hiawatha Creative Crewel Crafts
Design by ERICA WILSON


My work


Fascinating to do. But, I have a hard time working on laid work tied with cross bars, the stitch on the pine cone.


As I am doing this, my youngest, AJ, is so interested to learn this craft. I told her, we learned these in our home economics class, in grade six. So sad. These skills are not or rarely taught in school now.


Do you agree? comment please...


Till next crafting,


Jurich


Thursday, November 10, 2011

1ST CHARITY PROJECT


TODAY, is a rare date, a very special date from Yahoo News, http://news.yahoo.com/rare-date-today-once-10-000-years-palindrome-181607951.html.

For me, today is a wonderful day. I'm full of energy and very happy to post my 1st charity project. So, inspired with kindnessgirl, Patience Salgado's, to pass it on, her kindness act.

Ever since, I always have like to help others. In my own little way, I have been donating my time teaching interested young and adult beginners how to crochet for free.

Last November 5, I just started crocheting for charity. I'm making chemo caps for children who have cancer. My goal is to make 24 caps or more to be delivered this coming christmas. But wait, my craft materials were damaged by typhoon Pedring, including my stocks of cotton threads. What will I do? Hmm, think, think and think.

As the saying goes "if there's a will, there's a way". I texted some of my friends about my project and the result was so positive. Corey right away donated this cotton threads.


My crafty friends Lorna, Angie, Yolly, and Chy pledge to donate finished chemo caps.

Just this dawn, I finished one, for ages 3 & 4 girl cap.


Yesterday, I found some leftover cotton threads from my previous projects and was not damaged by typhoon Pedring. So, I started my 2nd chemo cap.


The patterns will follow.


Till next posting...


Happy crocheting & giving !!!


Jurich

Monday, November 7, 2011

WAIST HUGGER BELT


Last September 23, Sansenim Rem of Young Bio ordered a belt.She likes her belt about 3'' in width and the color must be neutral or a belt that can match to any color of her dress. So, after I measured her waistline, 26, my mind started wondering what design would I create to met her specification. I scanned my crochet books and crochet magazines, browsed my fav crochet blogs, Ravelry and Etsy. I've ended up with Lucy's, attic24, hexagon how to.
WAIST HUGGER BELT - that's what I've created.....


My youngest daughter, AJ, loves it too.

So, I made this 2nd belt for her . . . .


And this one . . . . .


Pattern

WAIST HUGGER BELT

design by Judy Cimafranca


THIS HEXAGON GRANNY SQUARED BELT IS A LUCY’S, ATTIC 24, INSPIRED DESIGN.

WRAPPED AROUND YOUR WAIST, WHAT A PERFECT FASHIONABLE ADD-ON TO YOUR

SIMPLE BUT ELEGANT DRESS OR PERHAPS A SKIRT ? CROCHET ONE NOW, WEAR IT,

WALK JUST LIKE SHAMCEY SUPSUP’S FAMOUS “ TSUNAMI

WALK “ AND PROUDLY SAY “ I MADE IT !!! ”.


Skill Level Beginner


Finished
size 33 inches in length

Each hexa side measures 2 3/8 inches and 4 ¾ inches across between

the points


You will need

Approx 100 yds tiny cord in

Dark blue Main Color (MC)

30 yds tiny cord in white Contrasting Color (CC)


1 silver belt buckle

Lighter

Tape measure


Hook I used silver hook # 1 ( imia brand ) Phils.


Stitches used


Chain stitch (ch)

Single stitch (sc)

Double crochet (dc)

Slip stitch (sl st)

Front loop (fl)


Stitch variation

2 double bobble stitch (Bbl st) –2 double crochet worked into the stitch leaving

the last loop of each on the hook,Yarn over and draw through all the loops on the

hook.


Joining in new yarn and changing color –work in the old yarn until two loops of the last stitch, drop

it, draw in the new color


Gauge

Take time to check your gauge

1 row of 12 dc = 1 ” in diameter


This project was created with tiny cord ( an alternative to yarn) in dark blue (MC) and in white (CC)


Pattern notes :

1 Rnd of MC and CC was used alternately in every row


Visit Lucy’s, attic24, hexagon how - to

http://attic24.typepad.com/weblog/hexagon-howto.html


Hexa square (make 6 pcs)


Rnd 1:
With MC (dark blue)
wind cord around finger to form a ring, ch 3


10 dc into the ring, then add another1 dc, pull the end of the cord to form the ring, join in CC (white)
work in MC until two loops of the last stitch remain, yarn over CC, drop MC, join with sl st to top of 1st ch 3


Rnd 2: With new color, CC, ch 2, 1 dc in same place (considered as 1st 2 – dc Bbl st), ch 2, make 2- dc Bbl stby * yo hook once, draw up lp in dc, yo draw through 2 lps on hk, then yo once, draw up lp in same place, yodraw through remaining 3 lps on hk; repeat from * 10 times; change color, drop CC, draw MC again, sl st to topof 1st 2 – dc Bbl st previously made.


Rnd 3: drop CC , draw MC, ch 3, 2 dc in 1st ch – 2sp, ch 1,

3 dc in next sp, repeat 10x ; join


Rnd 4: drop MC. Draw CC, ch 3, 1 sc in 1 ch sp, repeat 11 times. Join

Rnd 5: drop CC, draw MC, ch 3, 2 dc in same sp, ch 2, 3dc in same sp (1st corner made), ch 2, 3dc in next sp,ch 2, 3dc in next sp, ch 2, 3 dc in same sp (2nd corner made) repeat until you can make 6 corners; join with sl st.Fasten off and weave ends .


Joining Squares

Repeat the process of making hexagon granny square from Rnd 1 to Rnd 4.

Rnd 5: drop CC, draw in MC, ch 3, 2 dc in same sp, ch 1, now attached this to the 1st corner of the 1st hexasquare previously made, sl st front loop only to the 1st ch of the 1st hexa square made, ch 1, sl st front loop onlyto the 2nd ch, then 3 dc into the 3 ch sp of 2nd hexa square, ch 1, sl st front loop only to 1st hexa square made,3dc into the 3 ch sp of 2nd hexa square, ch 1, sl st front loop only into the 1st ch, 2nd corner of the 1st hexasquare made, ch 1, sl st front loop only into the next ch, 3dc into the same sp of 2nd hexa square made - - 1stside joining finished. Continue working all around, to form your 2nd hexa square, just like your 1st hexa.

Make another 4 hexa, repeat the process of joining


Finishing

Now, turn your work, work on the wrong side. Draw up lp on 1st corner, ch 1 – considered as 1 sc, 1 sc ineach stitch all around the 6 joined hexa, 1 sl st at the center of the hexa for shaping. Fasten off weave ends


The Belt


Rnd 1: draw up lp, MC, on the center side of your hexa, ch 1, 1 sc in same place, 1 sc in each 13 sc, ch 1, turn(14 sc)

Rnd 2: repeat Rnd 1 until Rnd 5, turn (14 sc)

Rnd 6: ch 1, 1 sc in each 12 sc, sk 1 sc, 1 sc, ch 1, turn ( 13 sc )

Rnd 7: sc in each 11 sc, sk 1 sc, 1 sc, ch 1, turn (12 sc)

Rnd 8: sc in each 10 sc, sk 1, 1 sc, ch 1, turn (11 sc)

Rnd 9: sc in each 10 sc, ch 1, turn (11 sc)

Rnd 10: sc in each 9 sc, ch 1, turn (10 sc)

Rnd 11: repeat Rnd 10 until Rnd 16. Fasten off, leaving tail about 6 inches for sewing.

Attached buckle, fold end of work at the center of buckle between Rnd 14 and Rnd 15 , then, using the hook instead of needle, draw up lp in each sc of Rnd 16 as if you are sewing. Fasten off. Weave ends. Secure end using a lighter


The right side – repeat process just like on the left side you’ve just made.

Rnd 1 to Rnd 16 until Rnd 20 – (10 sc)

Rnd 21: decrease 1 sc in every row until Rnd 28, to form an arrow. Fasten off and weave ends


Belt Stopper

Rnd 1: leave tail about 6 inches for sewing. Ch 3, 1sc in each 2 sc, ch 1, turn.

Rnd 2: 1sc in each 2sc, ch 1, turn.

Rnd 3: repeat Rnd 2 until Rnd 15. fasten off, leave tail about 6 inches for sewing. Attached

this on Rnd 7. sew using the hook on both sides.

Light all ends using the lighter to secure all ends.


Use lighter with CAUTION AS A SAFETY MEASURE.


That’s it guys, hope you understand my pattern. In my 36yrs of crocheting, this is my first EVER, to write apattern. I’m very thankful, at last, I’ve done it.


Please leave a comment for all your questions and I will come to you ASAP.


Happy Crocheting ….


till next post,


Jurich